

The ScribeMD handbook · Desktop app
ScribeMD on your computer
Hold one key to dictate into your EHR, email or any text box, record visits in the room or on a call, and check, copy and share the note, without opening a browser. Short, practical guides with screenshots of the app.
No matching guides
Try a feature name, such as dictation, shortcut, template, copy or SpeechMike.
Safe use and limitations
ScribeMD records a consultation or your dictation, transcribes it and drafts notes and letters for you to review. Everything it writes is a draft: it does not replace your clinical judgement, and it is not for use in emergencies.
You stay responsible for the record
- Read every note and letter before you use it, and compare it with what was said. Correct anything wrong or missing.
- Take particular care with drug names, doses, negatives ("no chest pain"), left and right, and numbers.
- Check that the note belongs to the right patient before you copy it into their record.
- Do not rely on ScribeMD to have captured something. If it matters and it is not in the note, add it yourself.
Known limitations
- Accuracy drops with background noise, people talking over each other, a distant microphone, strong accents, speech impairments and mixed languages.
- ScribeMD can mishear a word, attribute a statement to the wrong person or record something hypothetical as fact.
- It only knows what was said or what you gave it. It can leave details out and, rarely, add something that was not said.
On your computer
- Before you talk, check the dictation bar: the timer is running and the bars move while ScribeMD hears you.
- Dictated text is pasted where your cursor is. Click into the right field of the right patient's chart before you start, and read what was pasted.
- Lock your computer when you step away: the app keeps you signed in, so anyone at your computer can open your visits and notes.
- On a telehealth call, ScribeMD records the other side only while a visit is recording. Tell the patient they are being recorded, as you would in the room.
Telling patients
Tell patients at the start that ScribeMD will record and transcribe the consultation to draft their notes, and that they can say no. If a patient objects, do not record: write the notes yourself.
Your organization may switch off some features (such as Answers or Co-Pilot suggestions), ask you to approve each note before it is sent to another system, or ask you to confirm that you told the patient before each visit. These settings follow your organization's clinical safety and information governance decisions.
Found an error that could affect patient care? Report it through your organization's incident process and to us at support@scribemd.ai.
Install, sign in and set up
The desktop app works with your ScribeMD account: the visits you record and the templates you use are the same as in the web app. It runs in the menu bar, so your dictation key works in every app, even when its window is closed.
Install the app
The new desktop app is in beta on Mac. Open the DMG and drag ScribeMD to your Applications folder. If you would like to try it, write to support@scribemd.ai.
Sign in
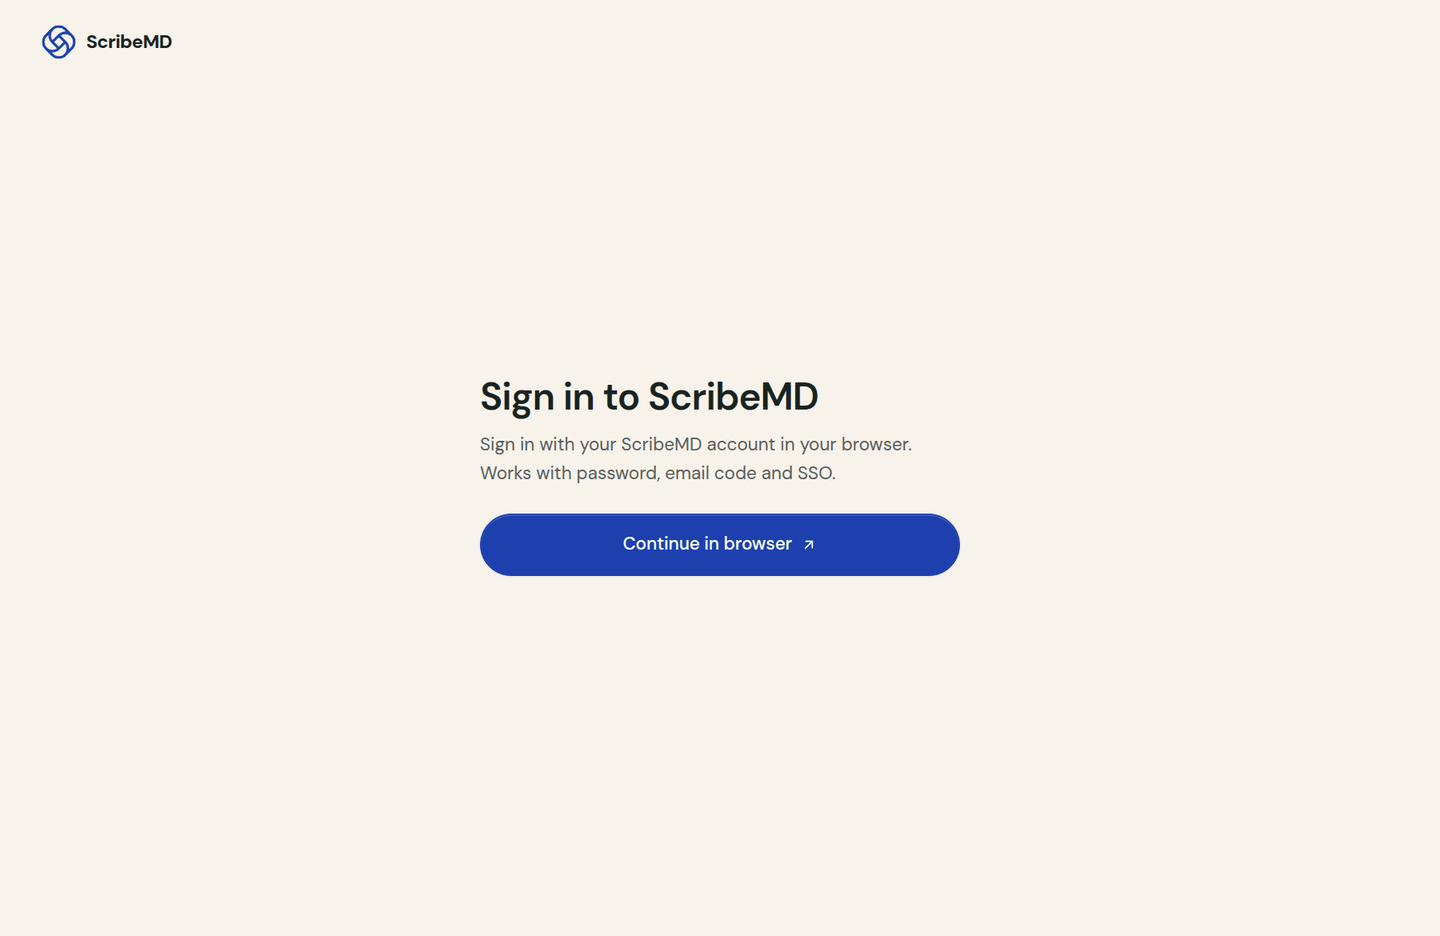
- Open ScribeMD and click Continue in browser.
- Your browser opens the ScribeMD sign-in page. Sign in as you usually do: password, emailed code or your organization's single sign-on.
- Go back to the app: it is signed in. To use another account, choose Switch account in the account menu at the bottom of the sidebar. If the browser is still signed in to the old account, sign out of the website first.
The setup guide
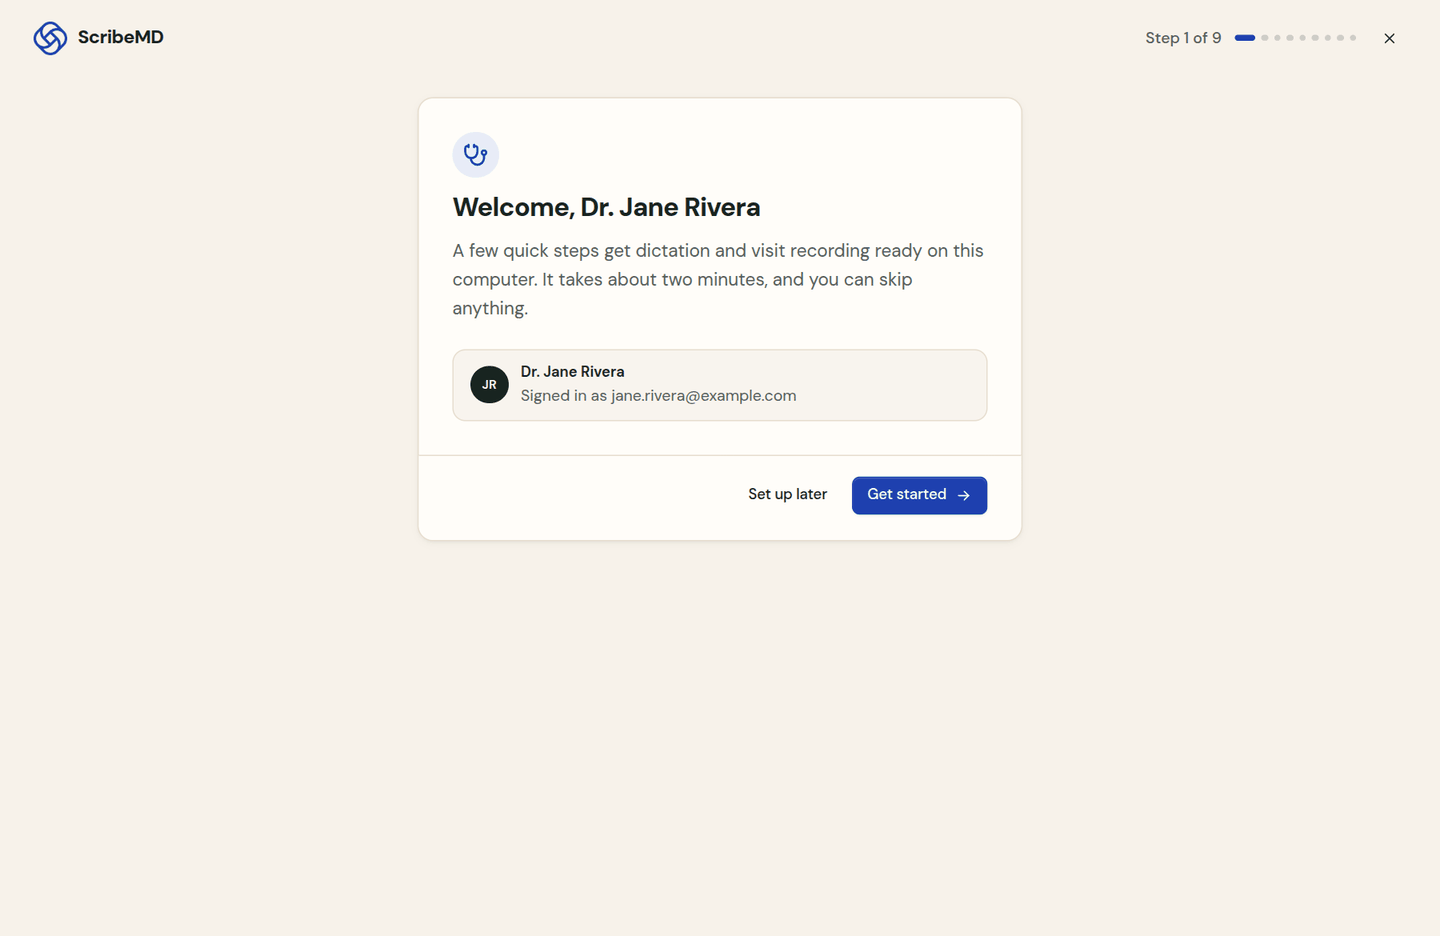
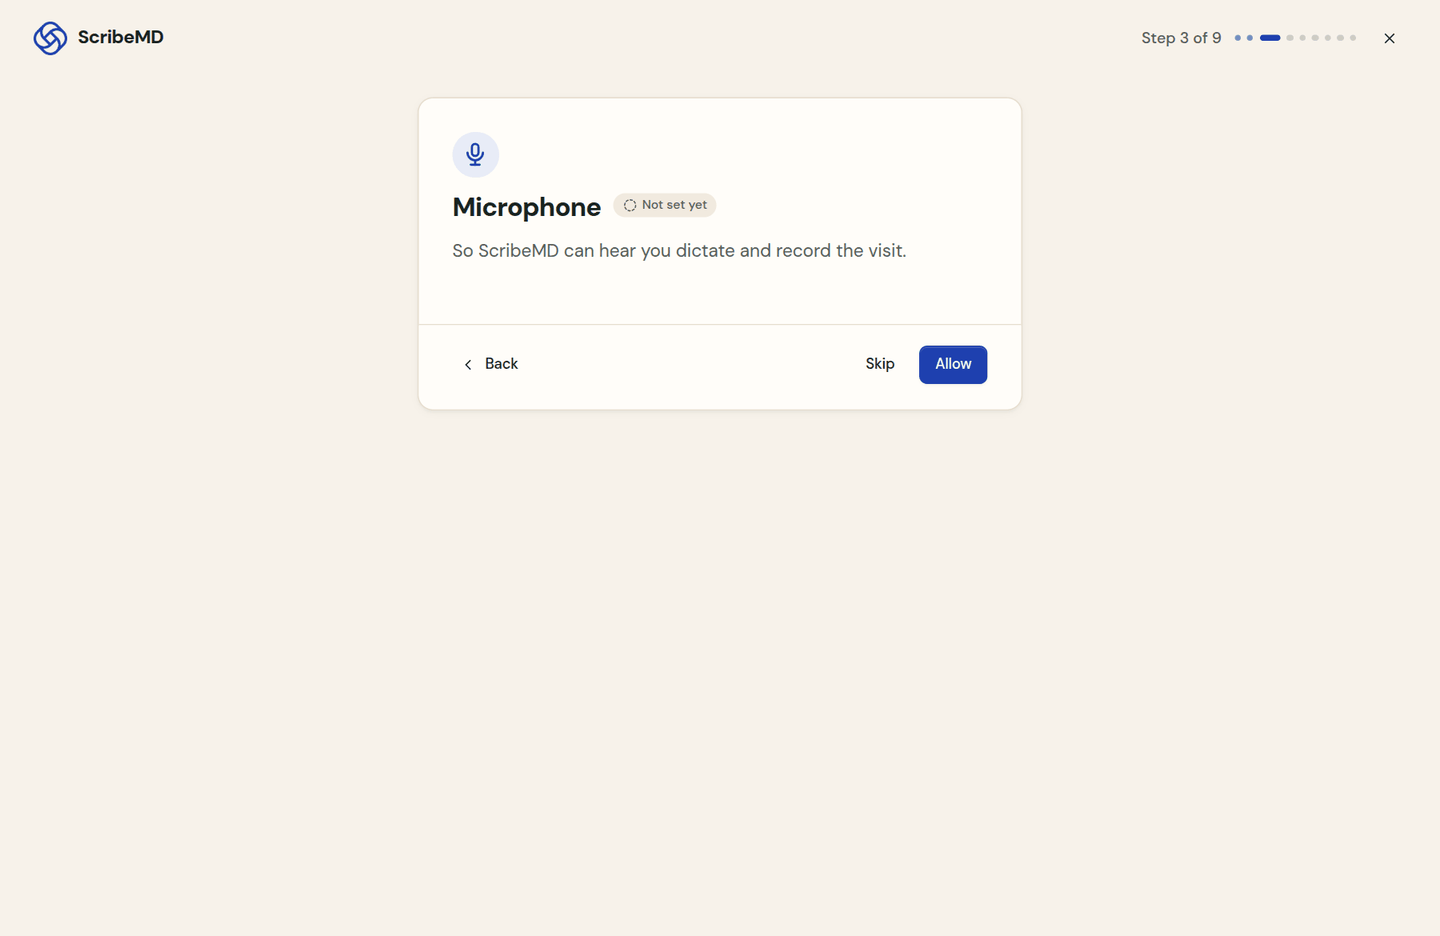
The first time you sign in, Set up ScribeMD walks you through the rest. It takes about two minutes, and you can skip any step.
- What will you use ScribeMD for? Choose Dictation anywhere, Visits or Both. The guide only asks for the permissions you need.
- Allow each permission when asked. On a Mac: Microphone to hear you, Accessibility to paste your words where your cursor is, Input Monitoring so the dictation key works in other apps, and System Audio Recording to hear the other side of a telehealth call. Each step opens the right page of System Settings; turn ScribeMD on there and come back.
- Try it: hold the dictation key, say a sentence and let go. Your words appear in the practice box.
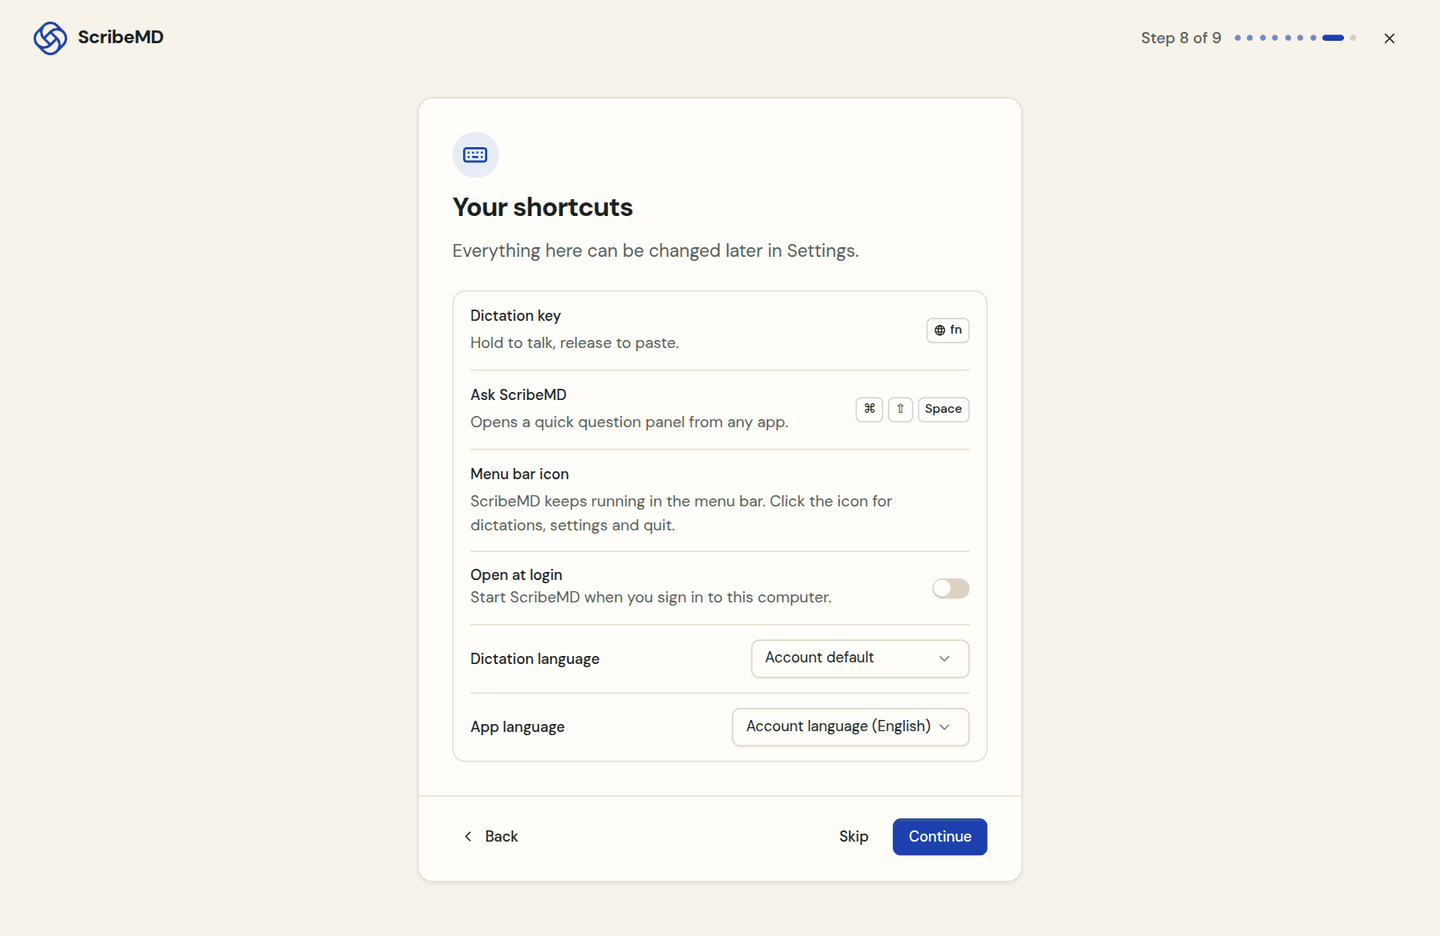
- Your shortcuts: check the dictation key, the Ask shortcut, the dictation language and Open at login. Everything here can be changed later in Settings.
Getting around
The sidebar on the left takes you everywhere. New Consultation at the top starts a visit; its arrow offers New Dictation. Visits that are still recording or being sent show under In progress.
| Screen | What you will find |
|---|---|
| Today | Your next appointments, the visits in progress, your recent visits and dictations, and buttons to start a visit, dictate or ask a question (chapter 5). |
| Schedule | Your appointments from your EHR, a day at a time, when your organization has connected its schedule (chapter 5). |
| Visits | Every visit with its note and transcript (chapter 4). |
| Dictations | What you dictated on this computer, to copy or paste again (chapter 2). |
| Patients | Your patients, with their visits and a summary (chapter 6). |
| Ask | Clinical questions, and questions about a visit or a patient (chapter 6). |
| Templates, Dot phrases | Your note templates and dot phrases (chapter 7). |
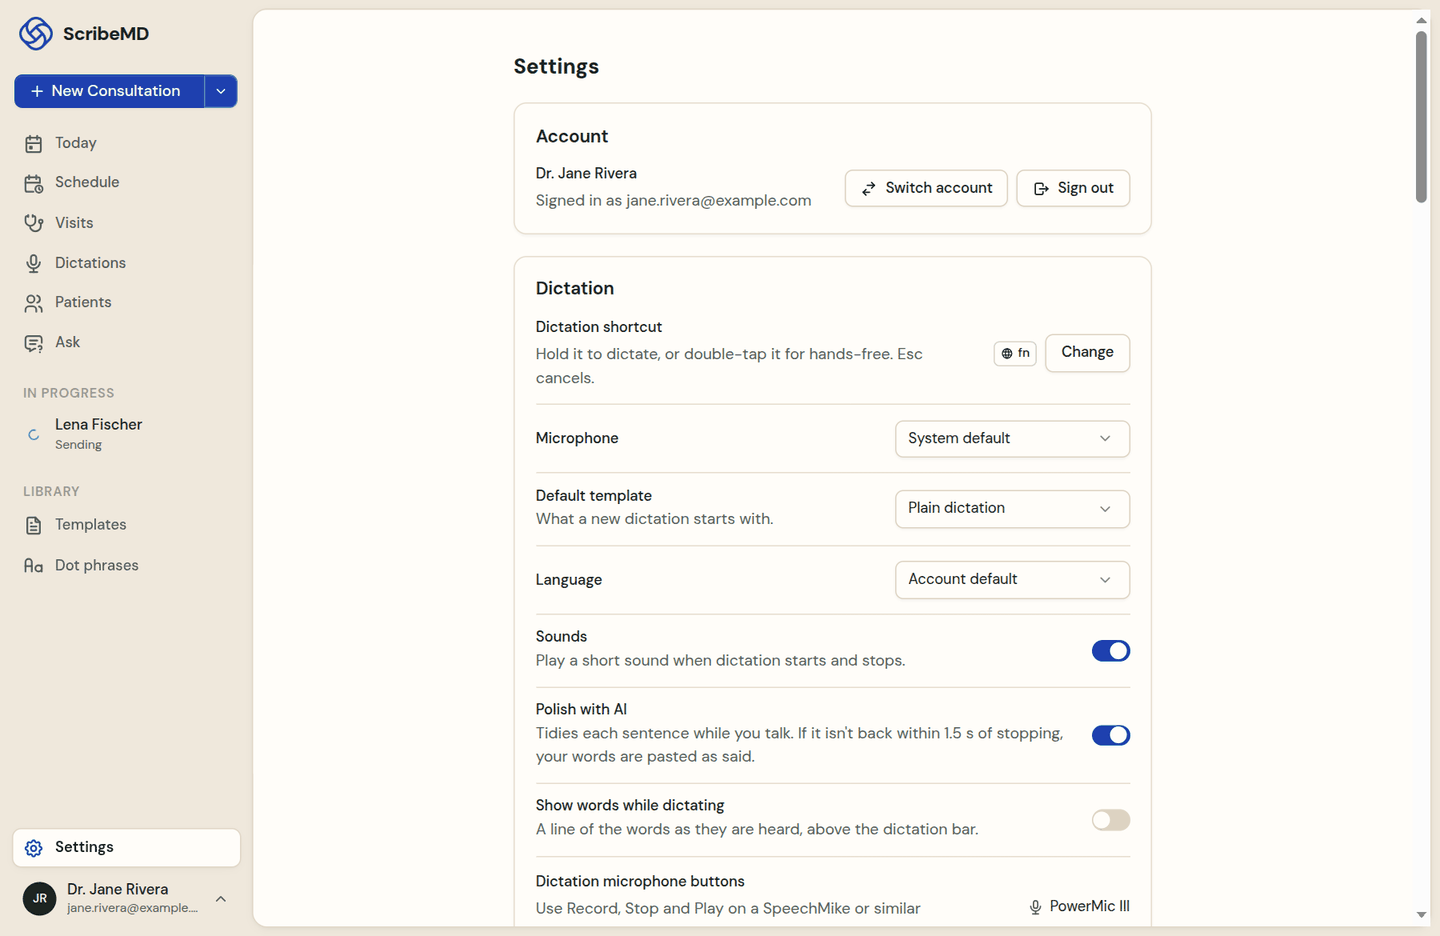
| Settings | Your account, dictation, shortcuts, permissions, devices and updates (chapter 8). |
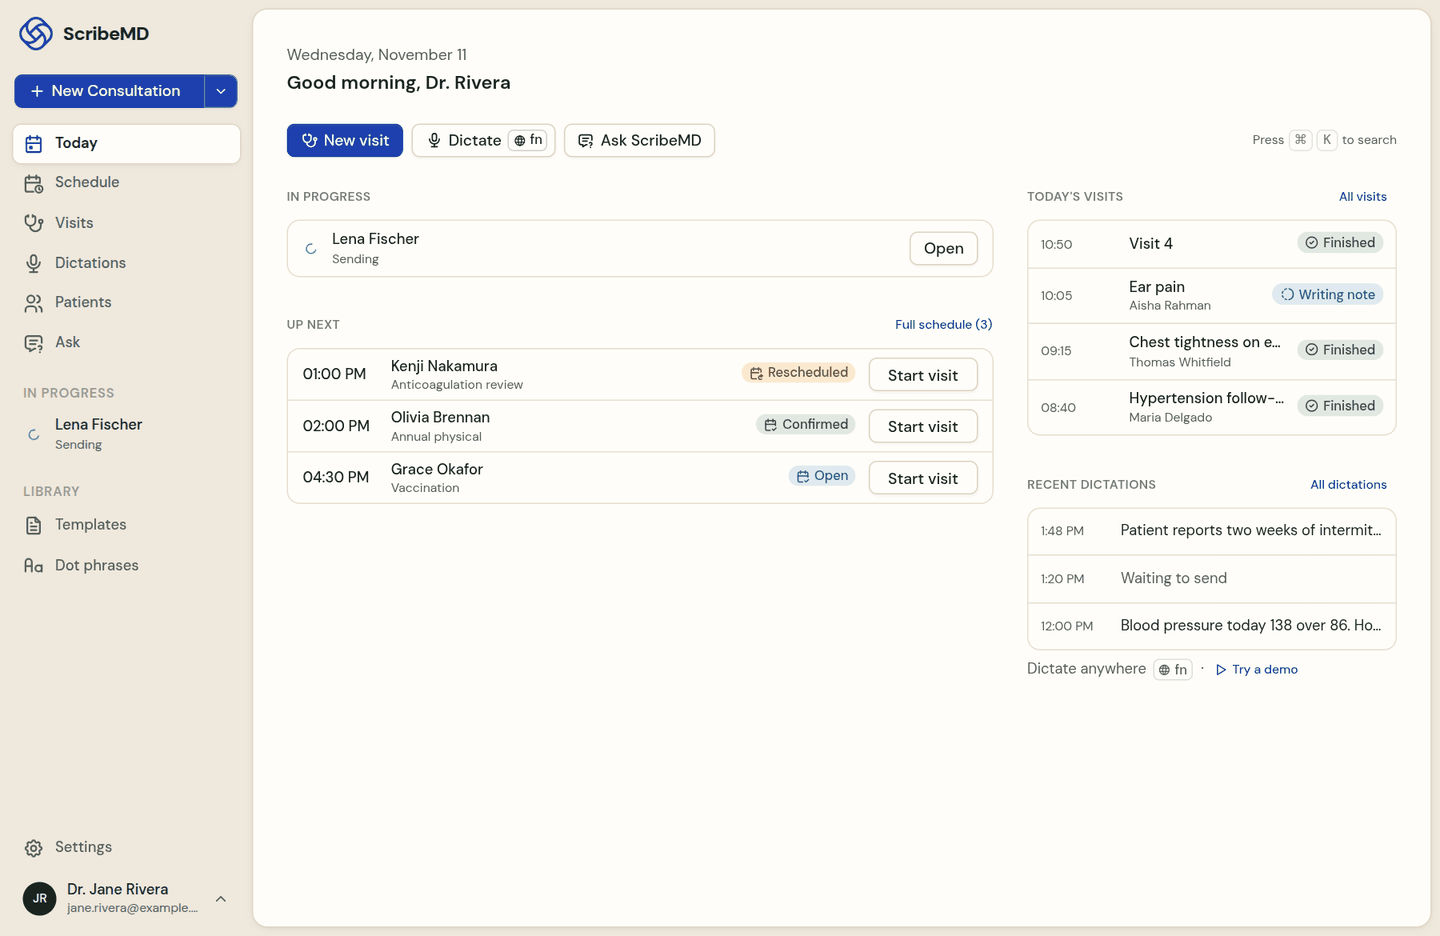
Closing the window does not quit ScribeMD. It keeps running in the menu bar and your shortcuts still work. Click the menu bar icon to open it again, see your dictations or quit.
Searching. Press ⌘ K anywhere in the app to search visits, patients and templates, or to ask a question.
Dictate into any app
Dictation turns your voice into clean text where your cursor is: your EHR, an email, a letter or any text box. A small bar shows that ScribeMD is listening. The dictation key is Fn on a Mac; you can choose another one in Settings.
Hold to talk
- Click where the text should go.
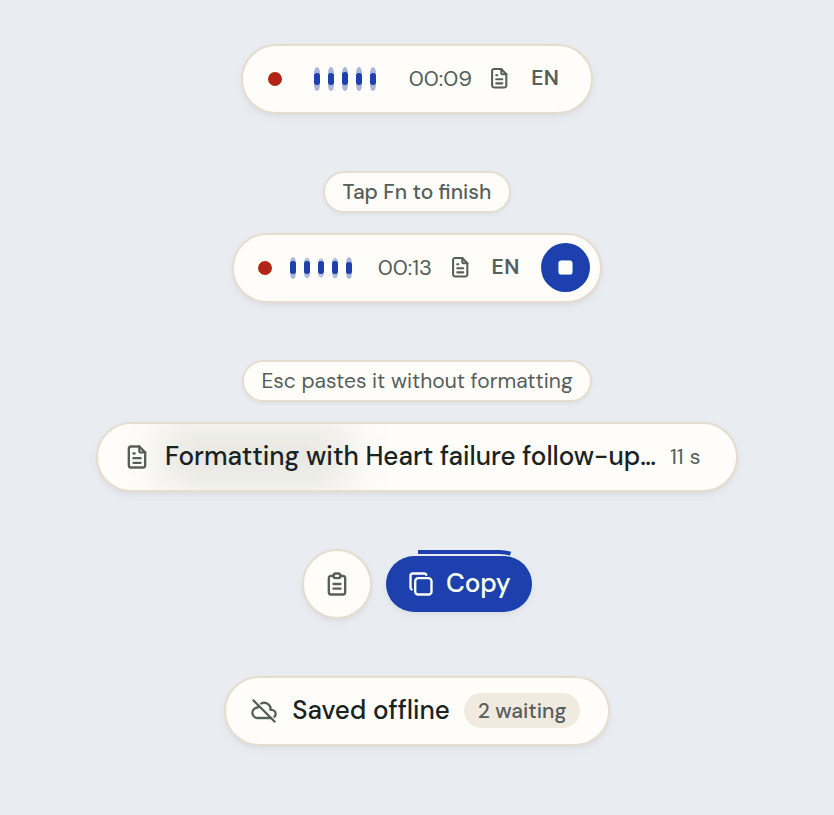
- Hold Fn and speak. The bar shows the timer and moving bars while ScribeMD hears you; the first word is never cut off.
- Let go. A moment later your words are pasted at the cursor. Your clipboard is put back the way it was.
- Changed your mind? Press Esc while you dictate to throw it away.
Hands-free, for longer dictations
- Double-tap Fn and let go: dictation keeps going on its own.
- Speak for as long as you need. The bar shows Tap Fn to finish.
- Tap Fn once, or click the stop button on the bar, to paste.
Dictate with a template
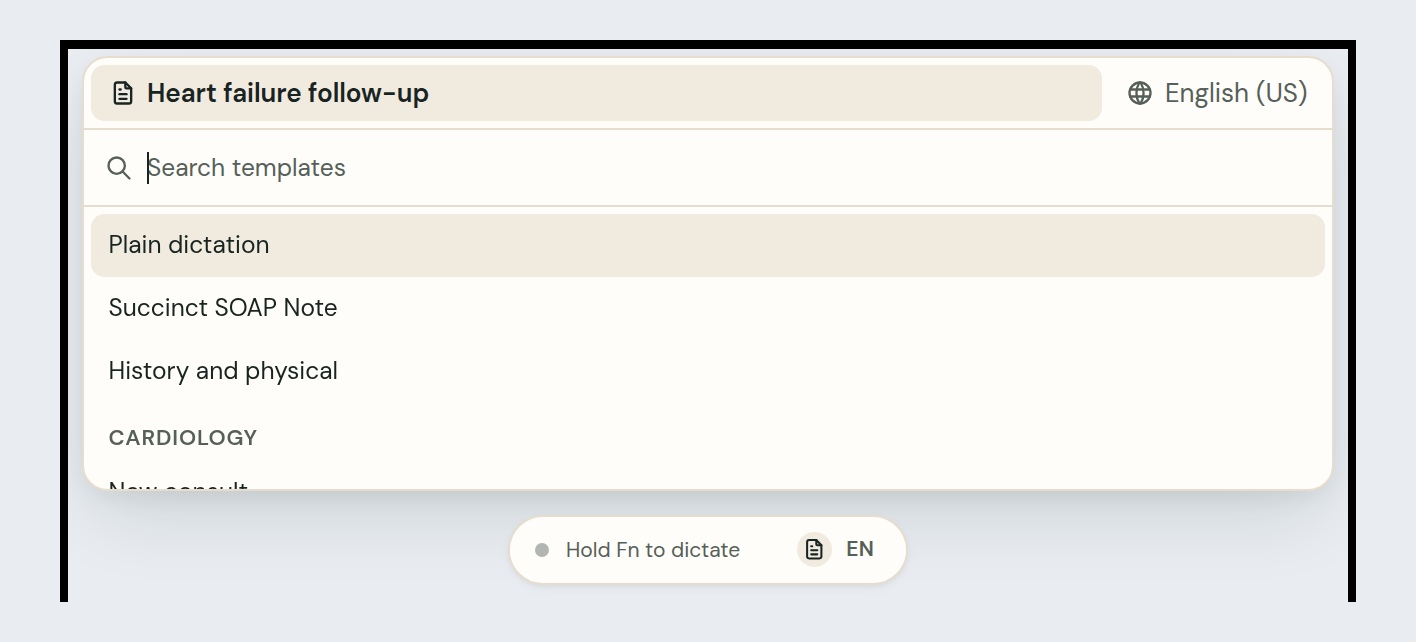
Click the template icon on the bar to pick a note template or the dictation language for the next dictation. With a template, your dictation is laid out in the template's sections: the bar says Formatting with and the template's name while it works. Press Esc to paste the words without formatting. Choose Plain dictation to paste your words without a template.
What the bar tells you
- Not pasted with a Copy button: ScribeMD could not find a text box where your cursor was. Click Copy, then paste the text yourself.
- Saved offline: you are offline. The recording is kept, encrypted, on this computer and is sent when you are back online. The text then waits in Dictations.
- Didn't catch that: ScribeMD heard no words. Try again a little louder.
- No microphone found: connect a microphone or choose another one in Settings.
Your dictations
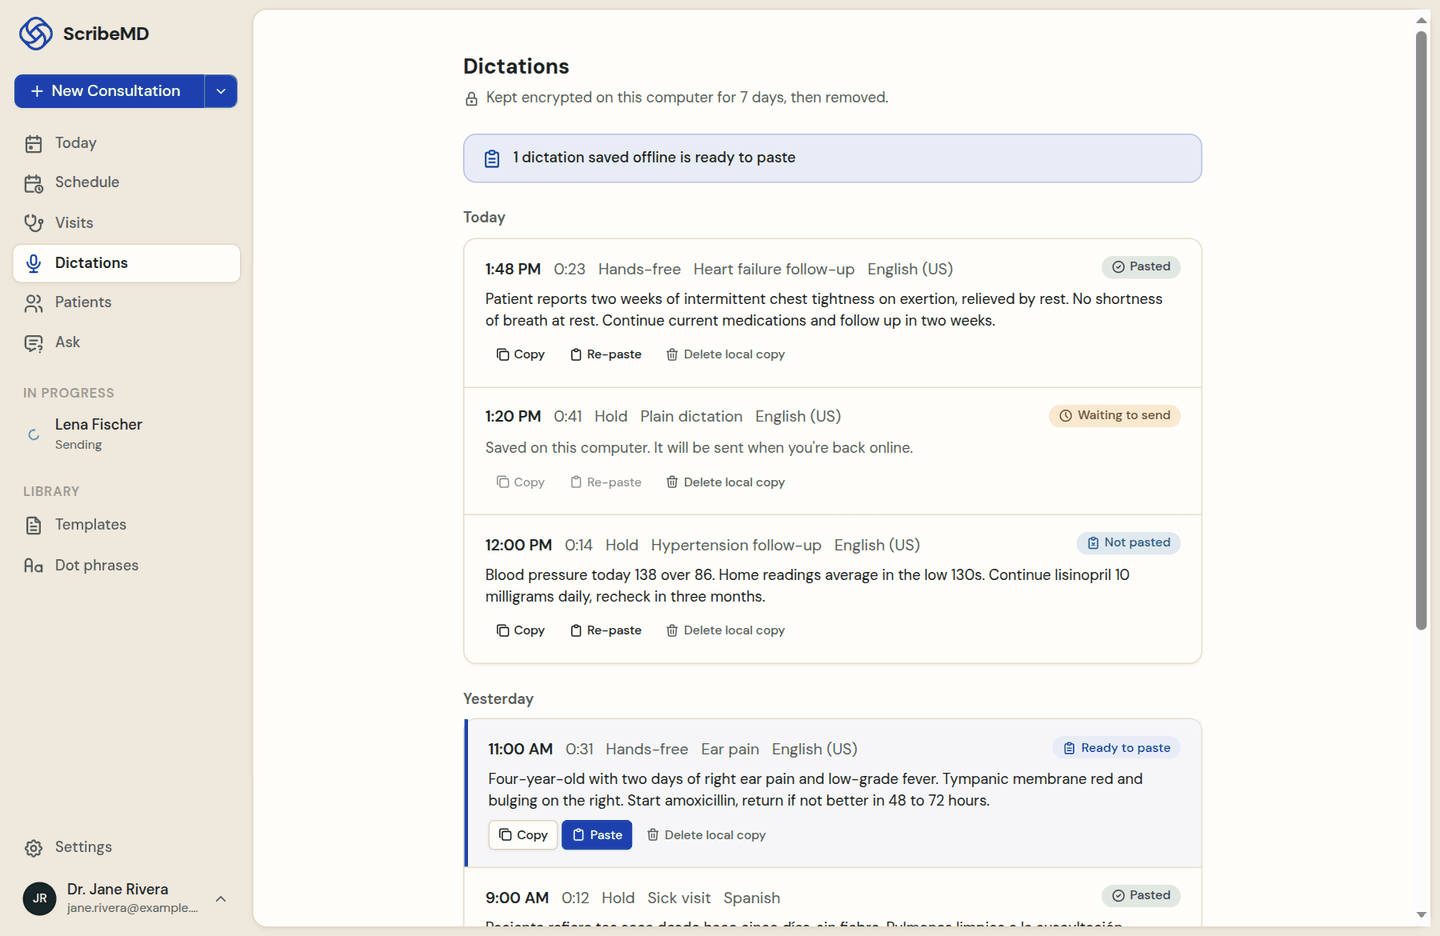
Dictations in the sidebar lists everything you dictated on this computer, newest first, with its status. Copy it, or Paste it into the app you were last in. Dictations are kept encrypted on this computer for a limited time, then removed; Delete local copy removes one now.
Dot phrases work in dictation. Say the trigger after a dot and the saved text is inserted (chapter 7).
Using a Philips SpeechMike? Plug it in: its buttons start and stop dictation without any Philips software (chapter 8).
Record a visit
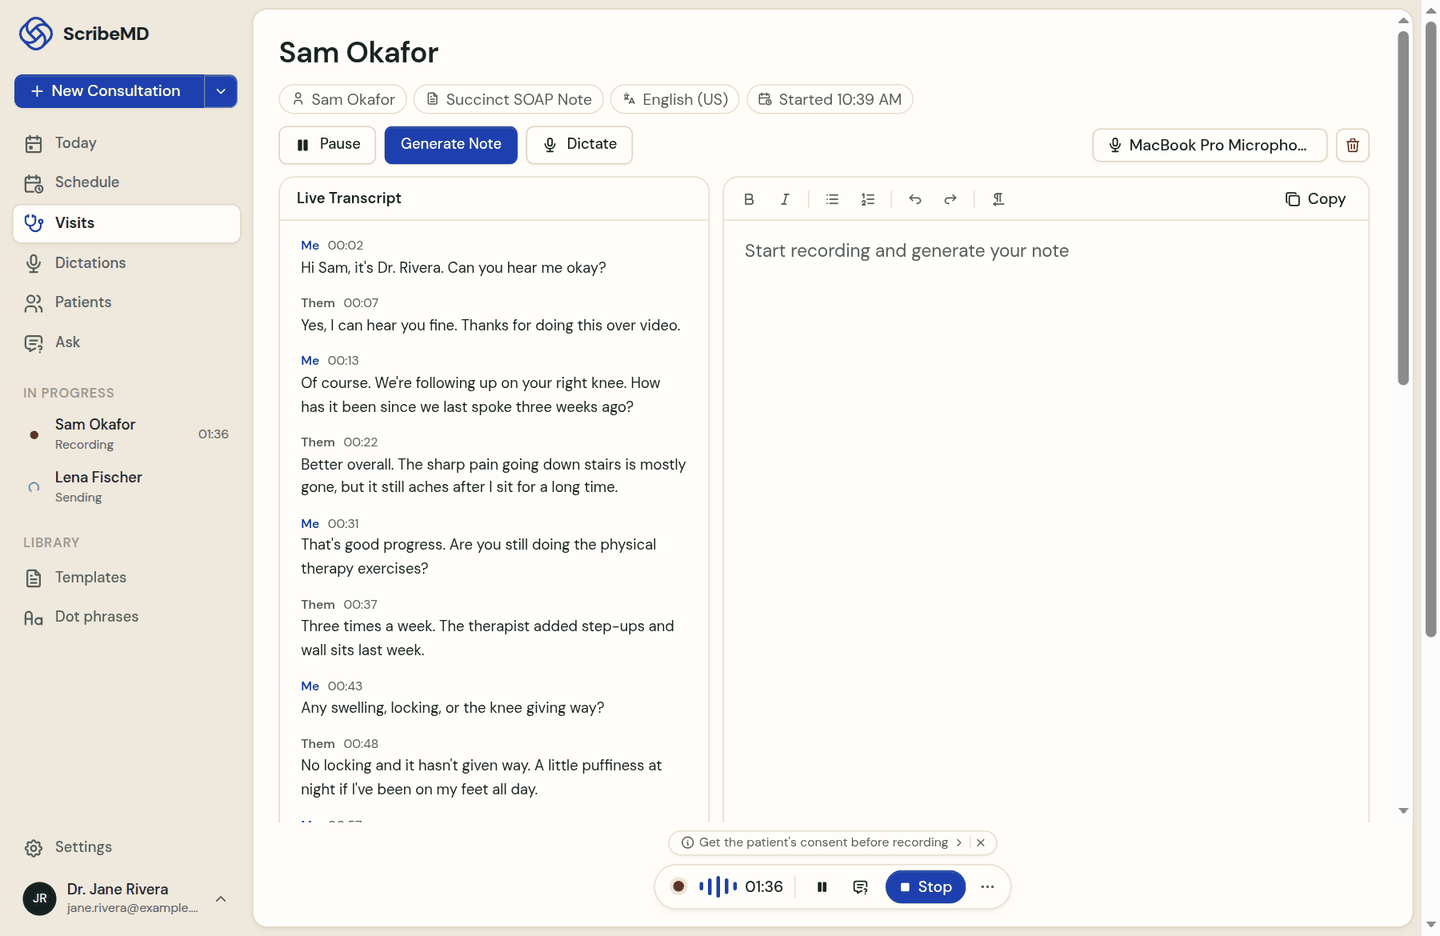
Record the conversation with your patient, in the room or on a telehealth call. ScribeMD transcribes it as you talk and writes the note with your template. Your microphone is labelled Me and the other side of a call is labelled Them.
Set up the visit
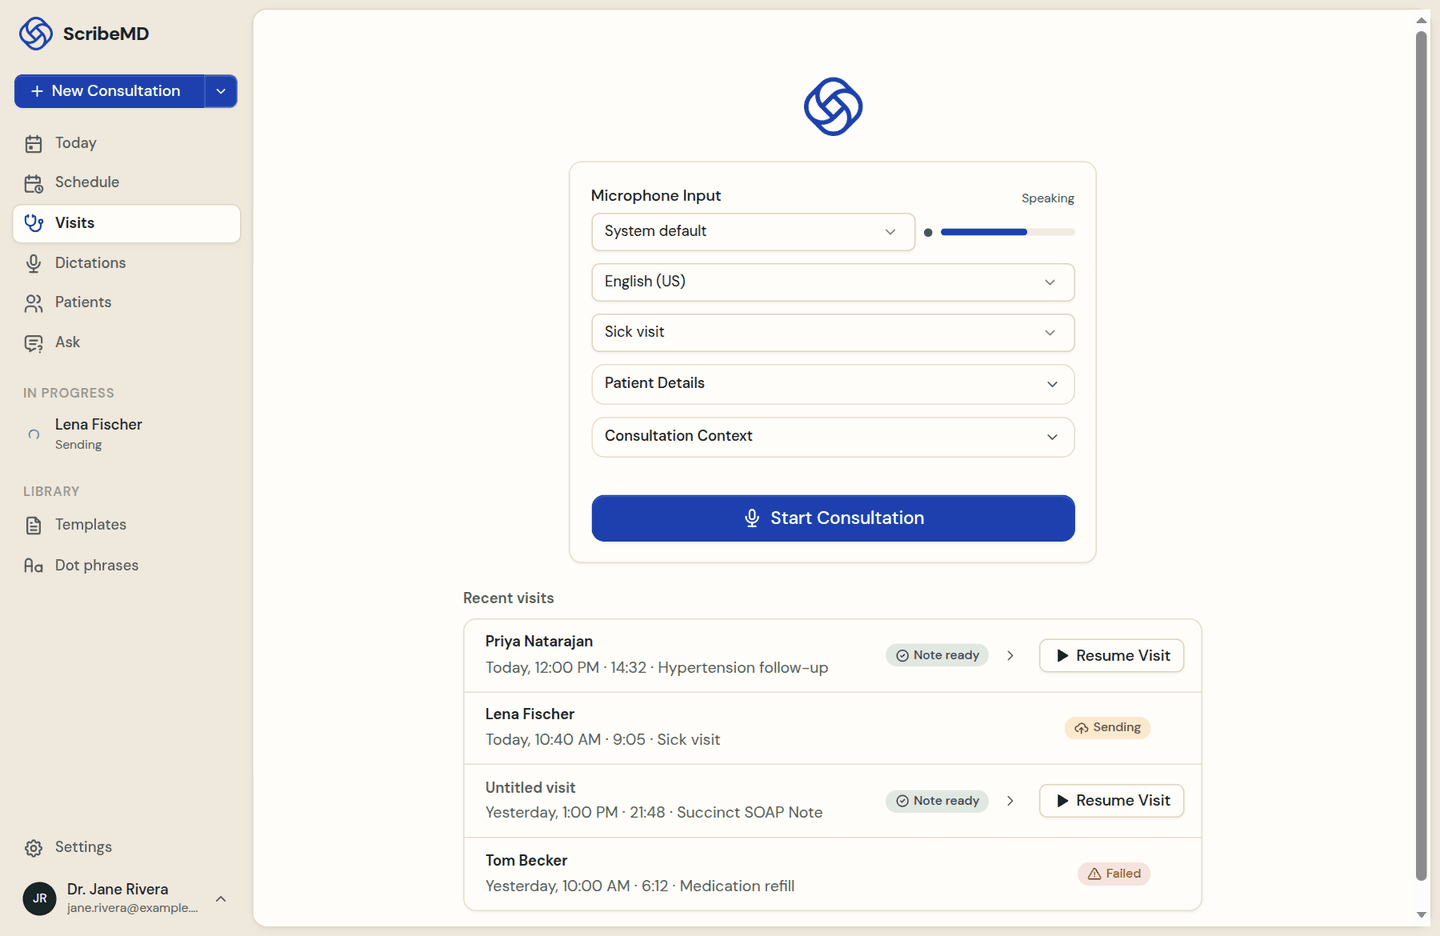
- Click New Consultation at the top of the sidebar, or Start visit next to an appointment on Today or Schedule.
- Check Microphone Input: the level moves when you speak. Check microphone warns you if it is too quiet.
- Choose the Language of the visit and the Note template. Your default template is selected; your starred templates come first.
- Open Patient Details to pick the patient or add a new one (optional), and Consultation Context for anything the note should take into account.
- If your organization requires patient consent, tick the consent box first. Then click Start Consultation.
Record and write the note
- The Live Transcript fills in as you talk; the timer and the sound levels are at the bottom.
- Pause during an interruption and Resume to carry on in the same visit.
- Generate Note writes the note with your template at any time. Dictate adds your own words to it.
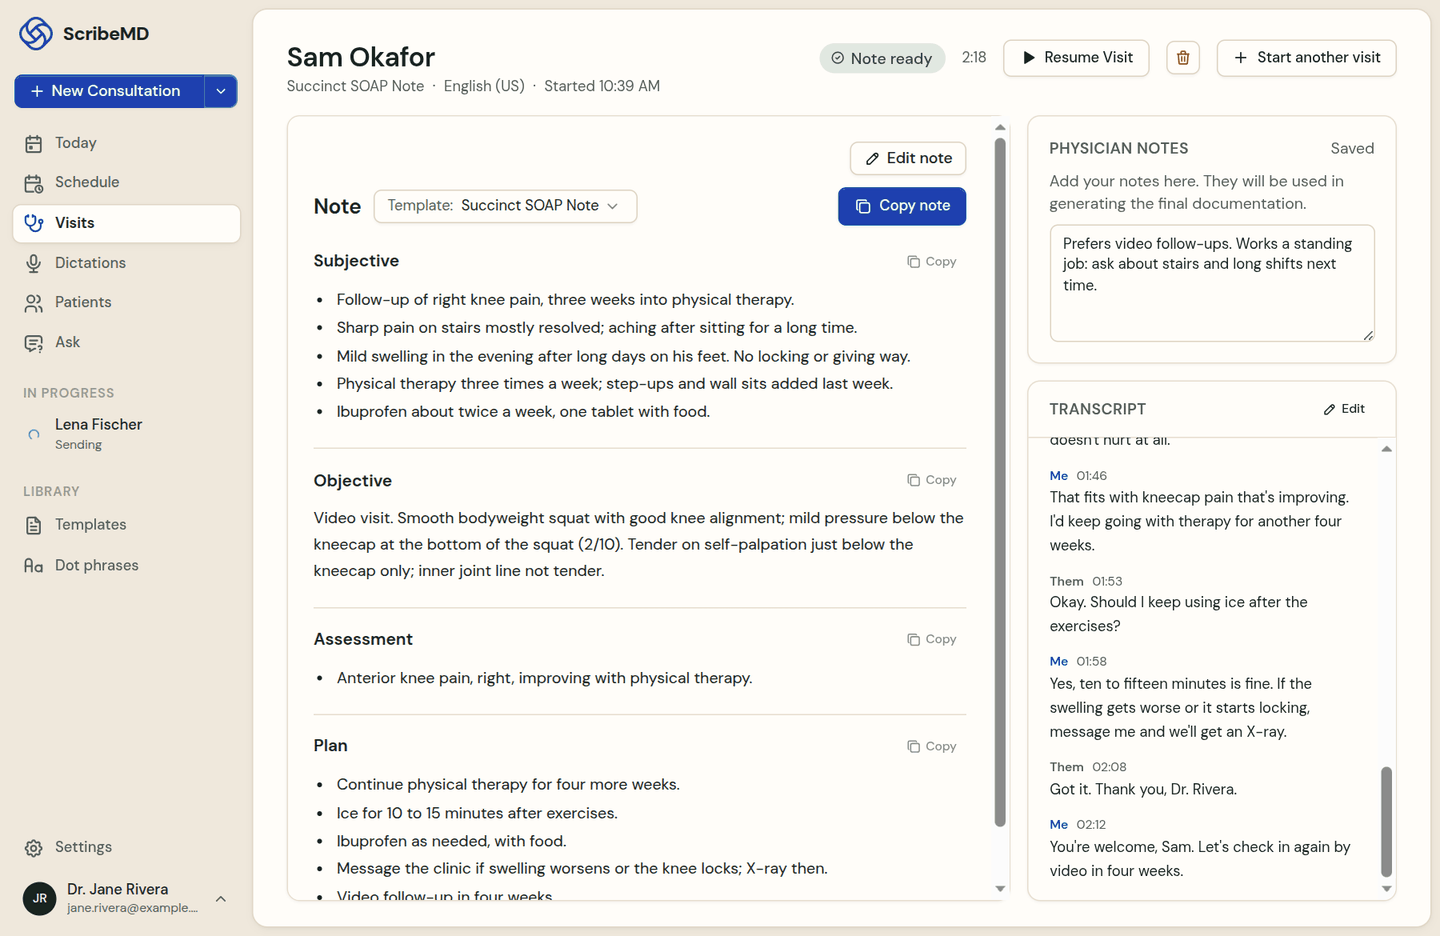
- Type in Physician Notes anything the note should include that was not said aloud. Notes are saved as you type.
- When the visit is over, click Stop. ScribeMD writes the note and the visit shows Note ready.
While you record
- Only one visit records at a time. Starting another asks you to stop the current one first; its note is written while you start the next.
- Telehealth calls. With System Audio Recording allowed, ScribeMD hears the other side of the call. If it hears nothing, the recorder says so and offers a test.
- No connection? Keep recording. The audio is kept on this computer and sent when you are back online.
- Your computer stays awake while a visit records.
Short on time? Click Start another visit as soon as you stop: the note keeps being written in the background and shows under In progress.
Review, copy and share a note
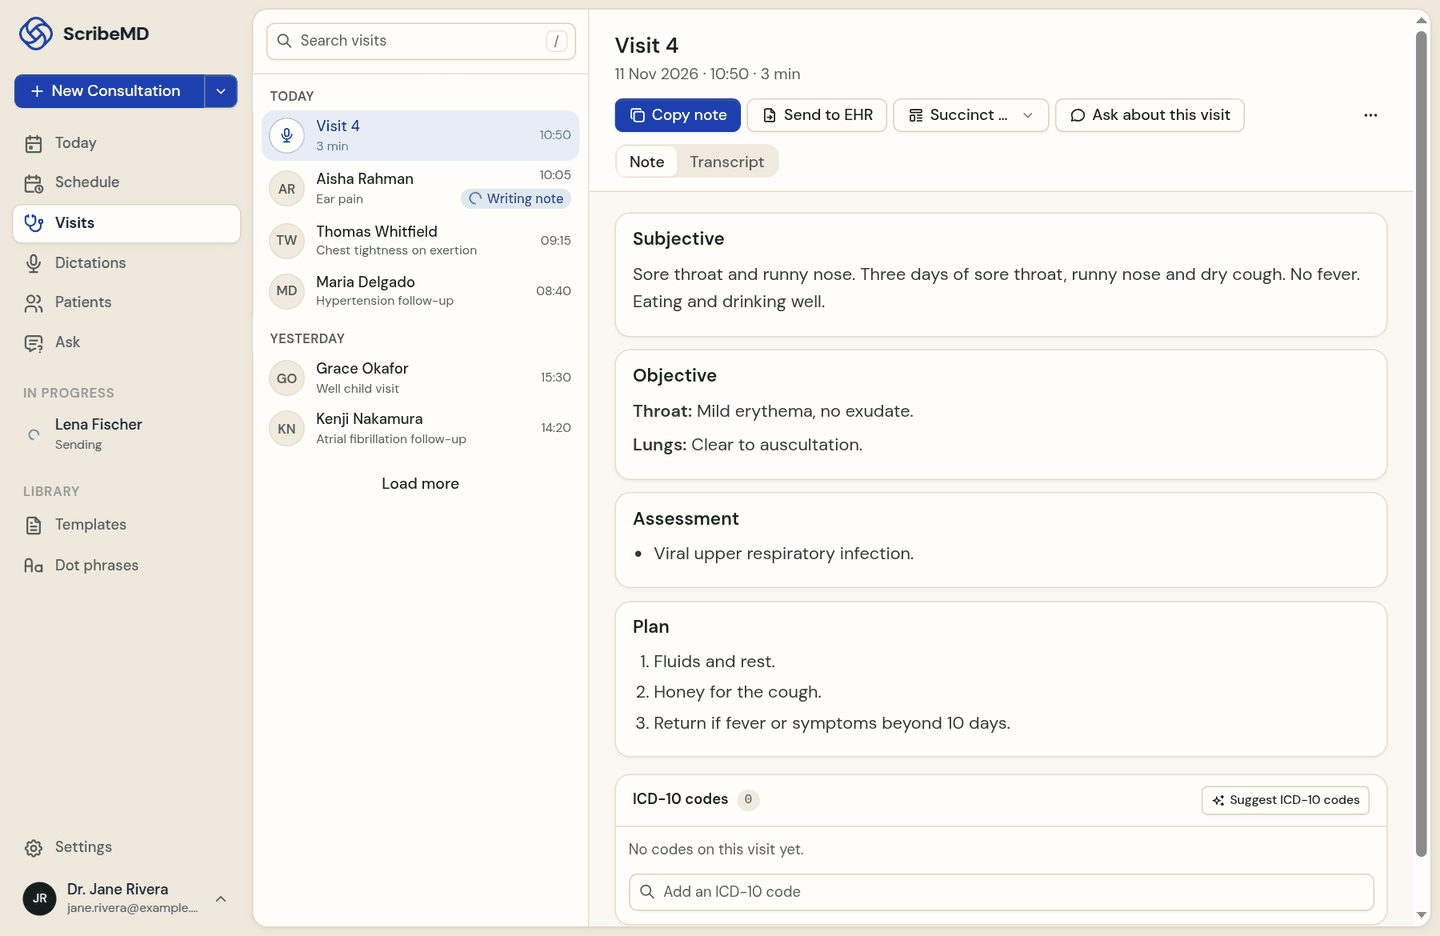
Read every note before you use it. Visits lists your visits by day; click one to open its note and transcript.
Copy the note into your EHR
- Click Copy note (or press C) to copy the whole note, then paste it into your EHR.
- To copy one section only, use the Copy button on that section.
- The Transcript tab shows what was said, with Copy transcript.
Edit, rewrite or regenerate
- Edit a section to correct it yourself.
- Magic edit rewrites the note from an instruction, for example Make the assessment shorter.
- Template: choose another template and Regenerate to write the note again with it. The current note is replaced, and kept under Versions.
- Approve marks the note as approved, with your name.
More actions
- Versions: each time the note is written, edited or restored, a version is kept. Restoring one never deletes anything.
- Share by email: the recipient gets a link to the note that works for 7 days.
- Download PDF and Download Word save the note to your Downloads folder.
- ICD-10 codes, under the note: Suggest ICD-10 codes proposes codes from the note, and you add the ones you agree with. You can also look a code up yourself.
- Ask about this visit answers questions from this visit's note and transcript.
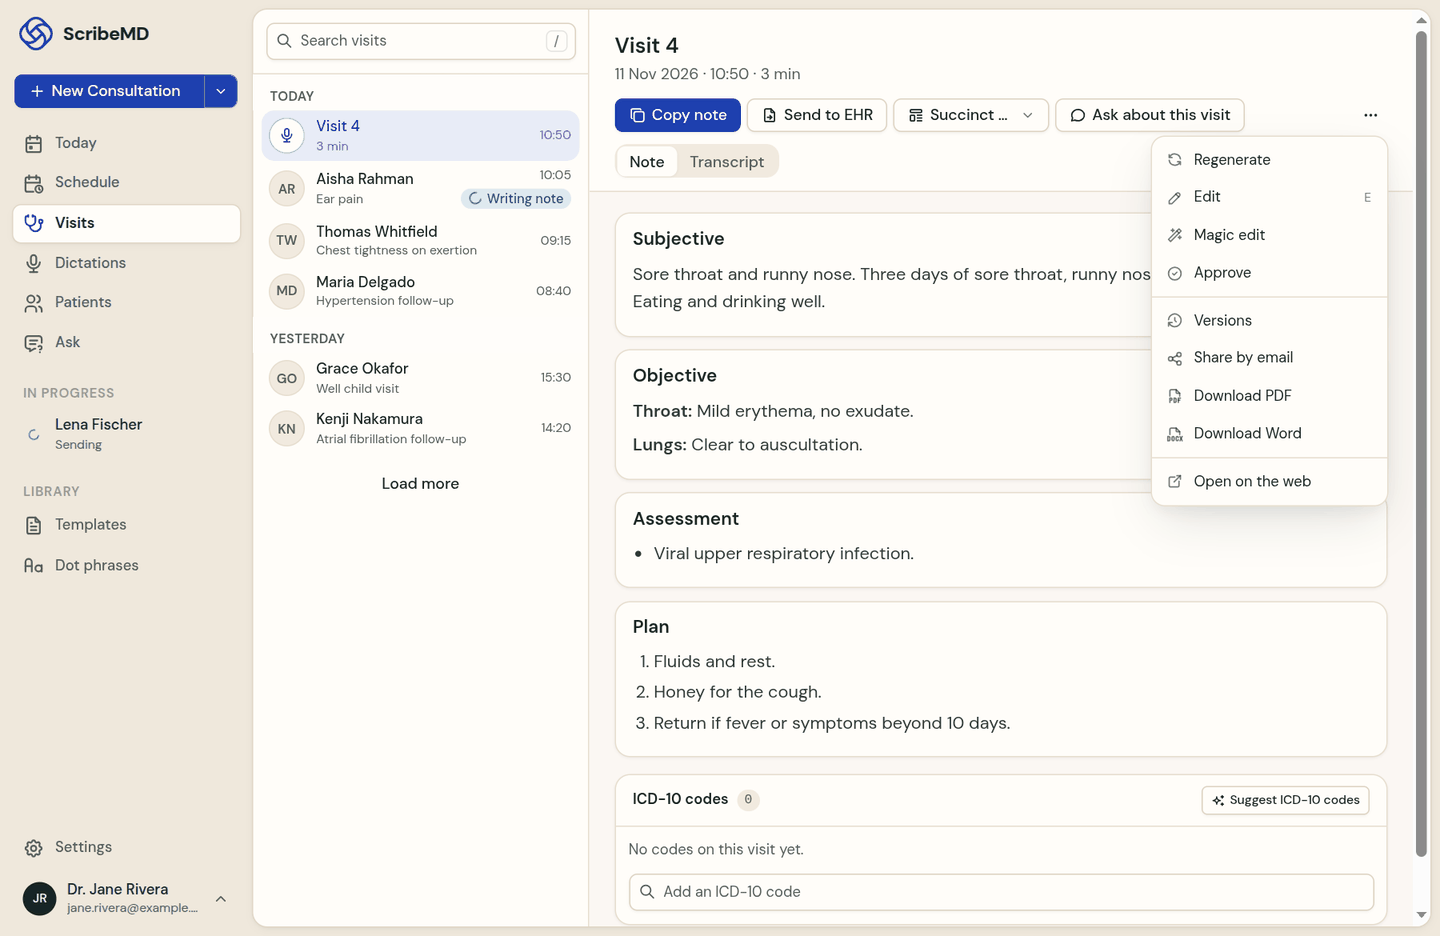
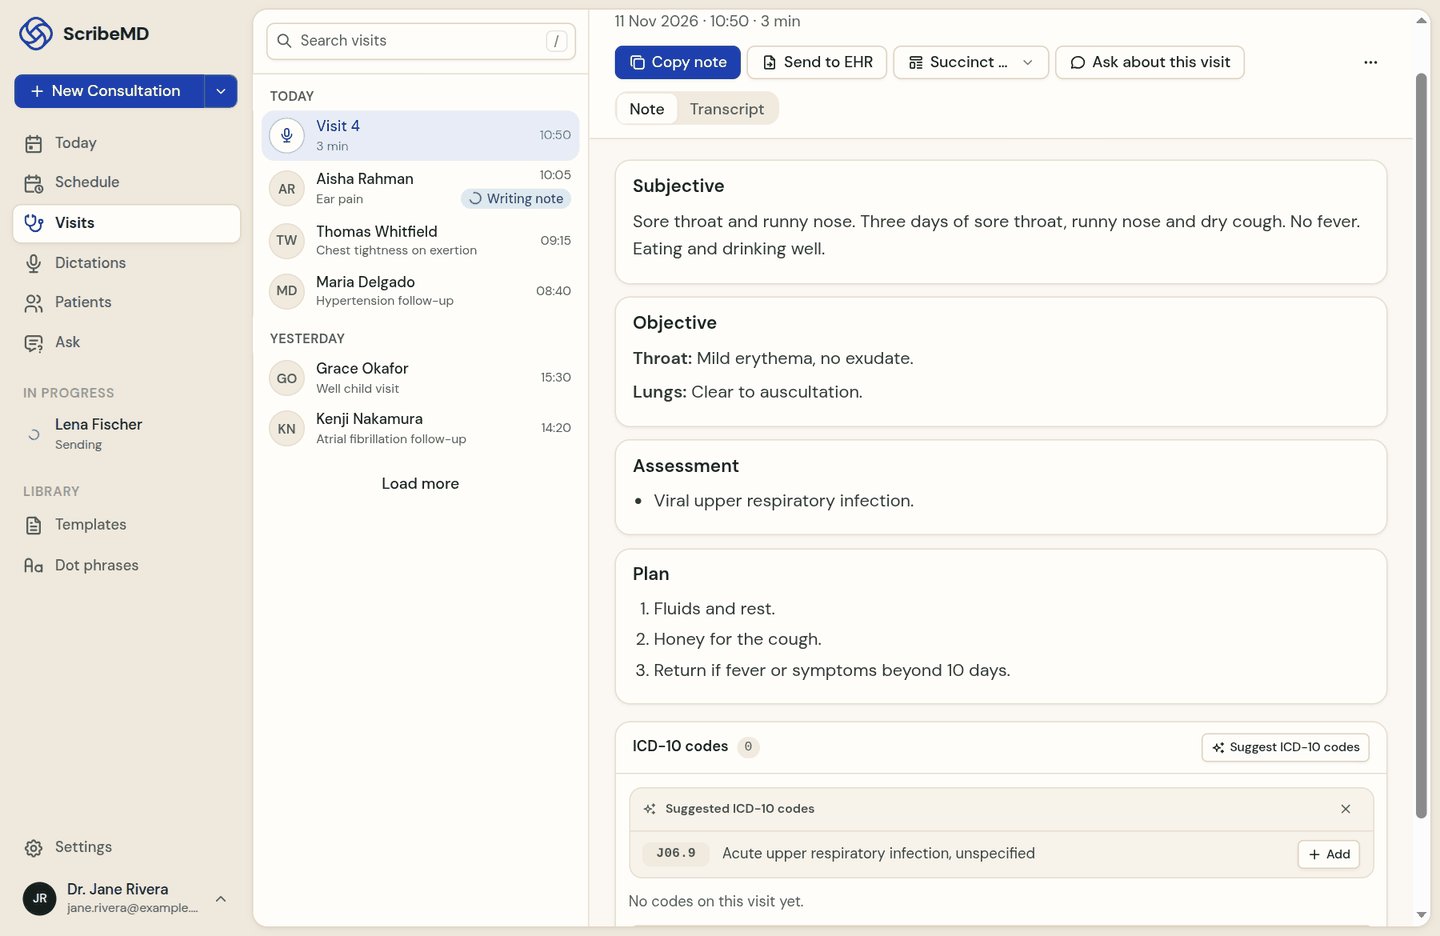
Send to EHR. Where your organization uses ScribeMD's computer use, Send to EHR asks ScribeMD to fill the note into the EHR open on your screen. It shows every step, and nothing is sent or submitted until you press Send on the confirmation card.
Today and your schedule
Today is where the app opens: what is next on your schedule, the visits still being recorded or written, and your recent visits and dictations.
- Under Up next, click Start visit next to an appointment: the visit starts with that patient attached.
- Schedule in the sidebar shows the whole day from your EHR. Move a day or a week at a time, filter by status (Scheduled, Checked in, In room, Done), or search by patient, reason or room.
- Open visit opens a visit already recorded for that appointment; Open patient opens the patient.
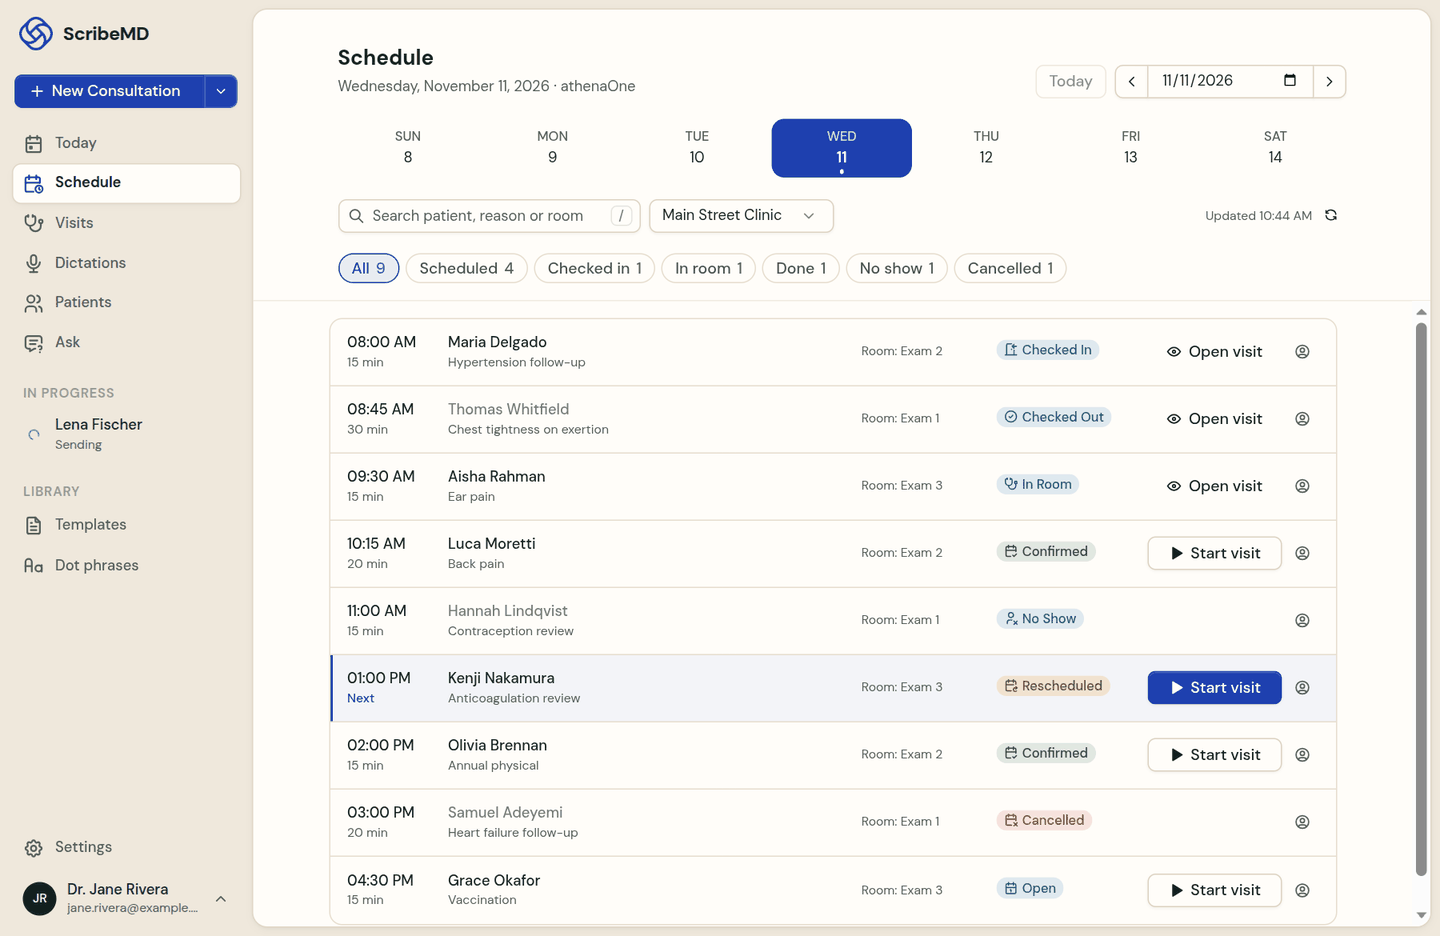
No schedule? The schedule comes from your EHR. If it is not connected, the screen offers Set up on the web. If your EHR sign-in has expired, sign in again from the message.
Patients and Ask
Patients gathers each patient's visits and a summary of their record. Ask answers clinical questions with sources, and questions about a visit or a patient from their notes.
Patients
- Click Patients and search by name, or Add a new patient.
- Click a patient to see their details, the clinical summary and their visits. Summarize visits brings the summary up to date.
- Ask about this patient answers questions from this patient's notes.
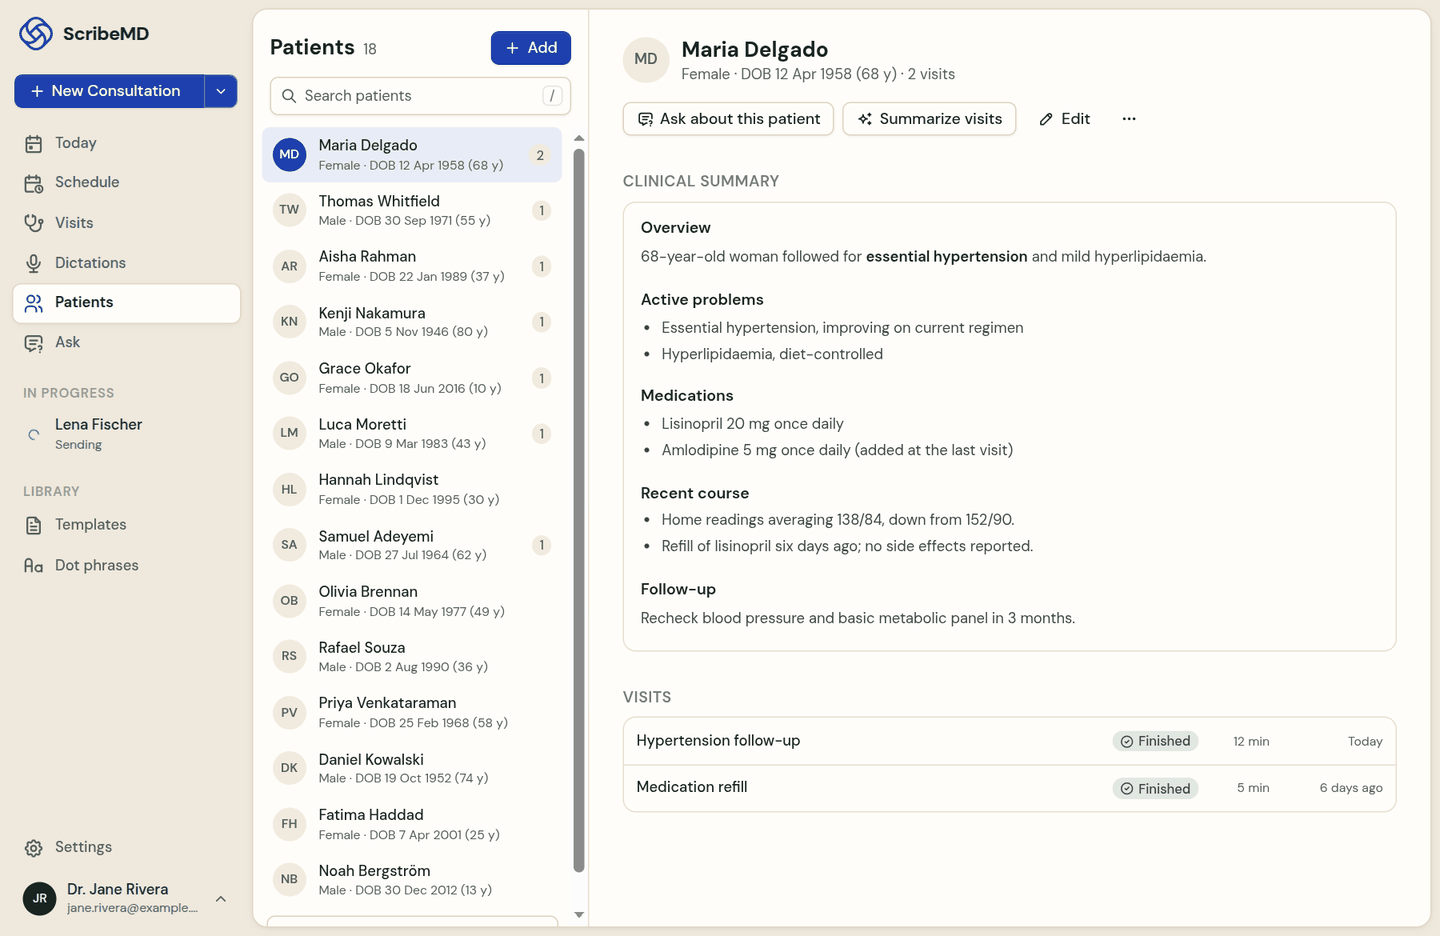
Ask
- Click Ask in the sidebar, or press ⌘ ⇧ Space in any app to open a small Ask panel.
- Type your question and press Enter. Answers cite their sources: check them before you act.
- Your earlier questions are listed under Conversations.
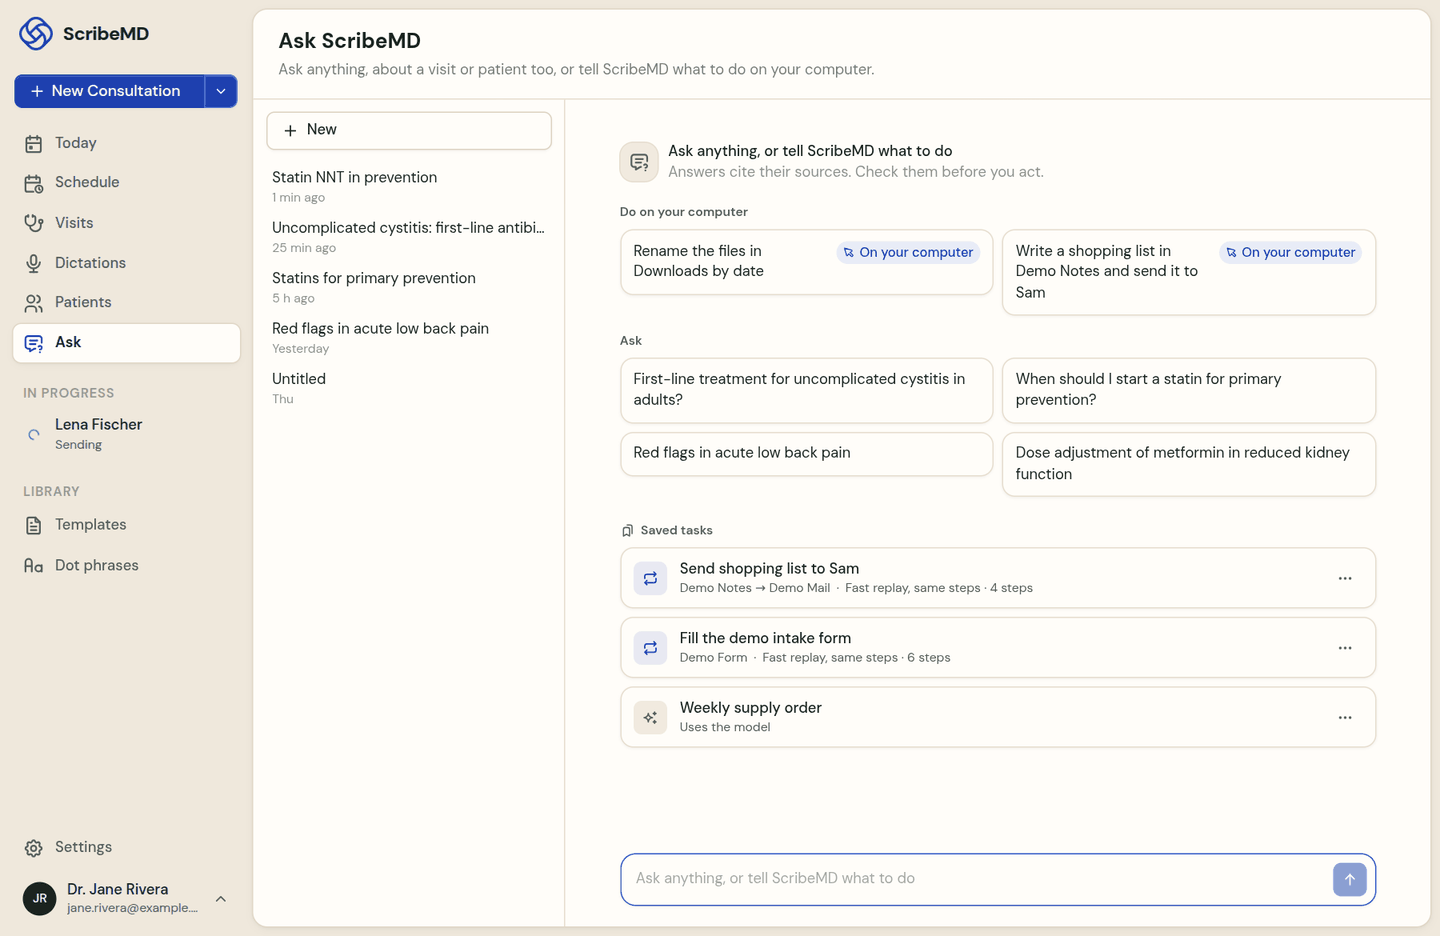
Never put patient identifiers in a general question. To ask about a patient, ask from their page or their visit.
Templates, dot phrases and keywords
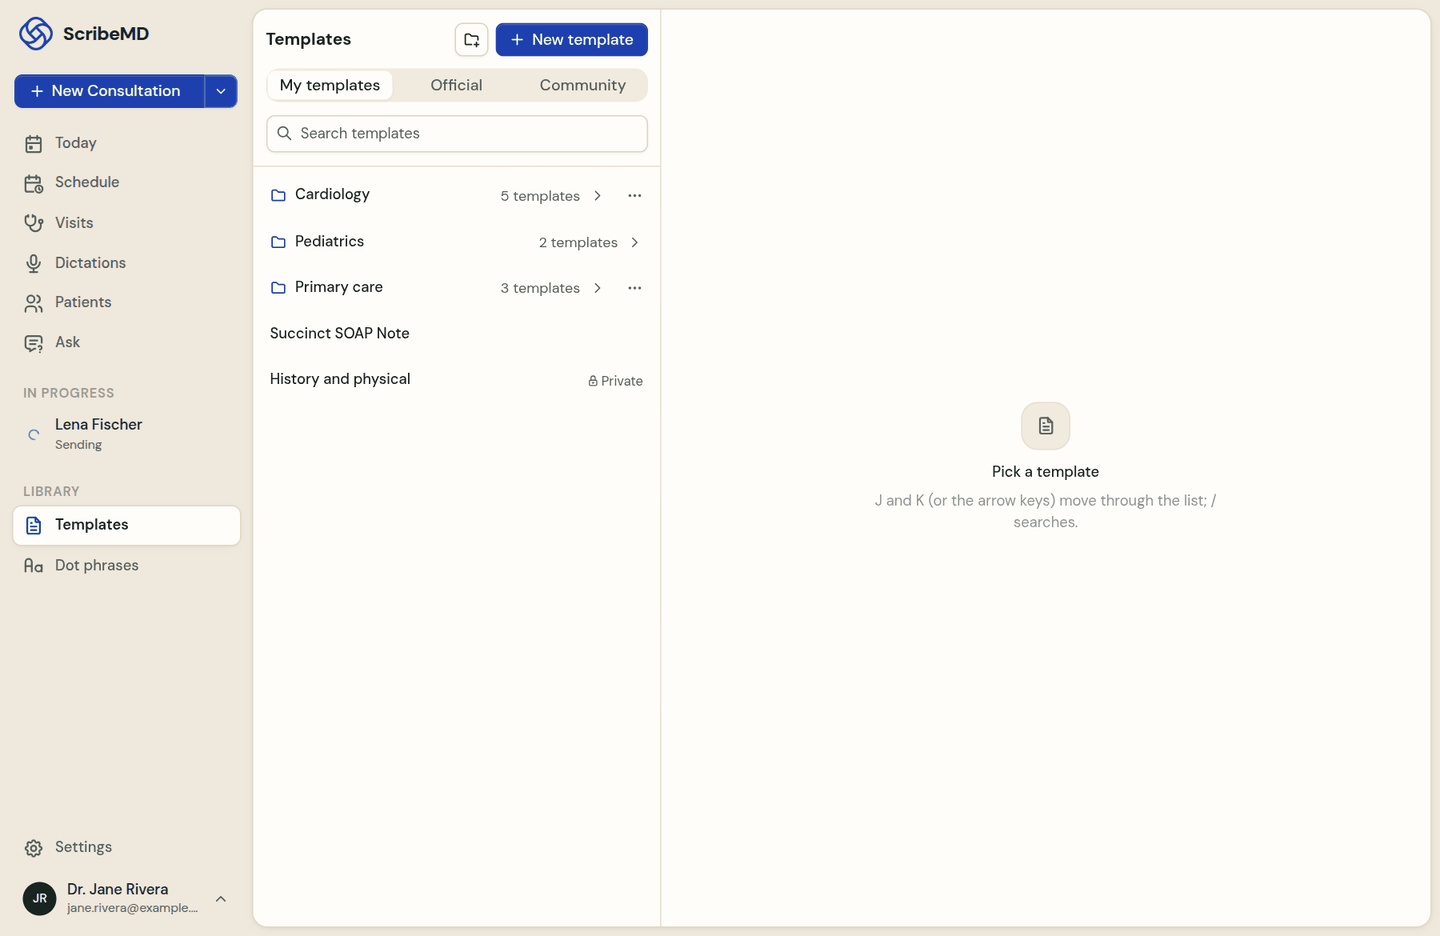
Your templates, dot phrases and custom keywords are the same as in the web app: a change made here is there too, and the other way round.
Templates
- Click Templates. My templates holds yours, in folders; Official and Community hold ScribeMD's and the ones shared with you.
- New template: give it a name and choose whether it is Private, then add its sections, each with a name and instructions.
- Click a template to see its sections; Edit sections to change them. Reordering sections, their style and guidelines are set in the web app.
Dot phrases
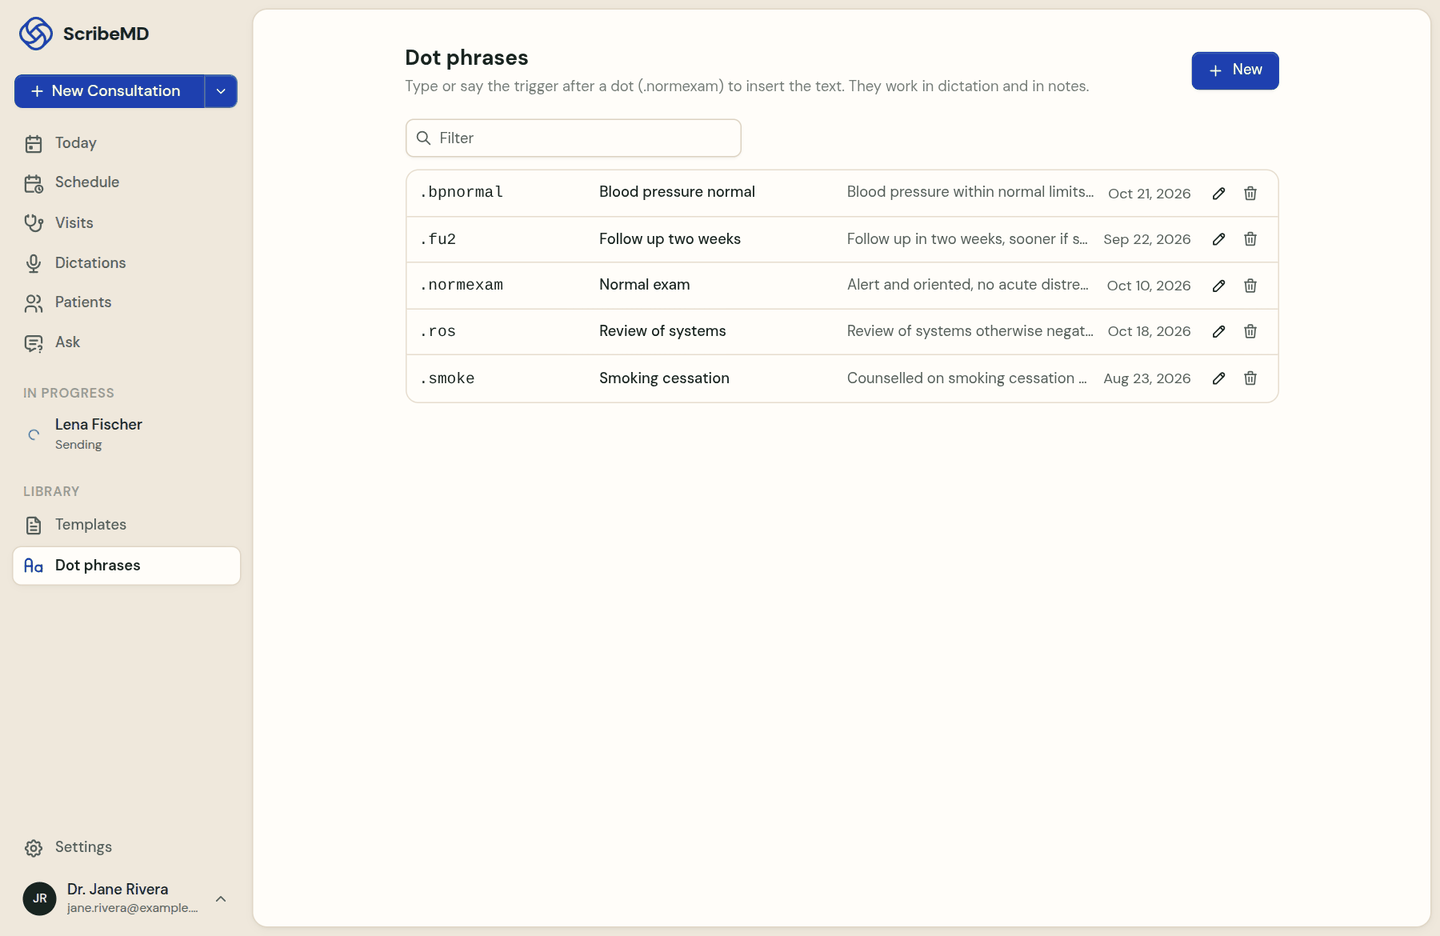
A dot phrase inserts text you write again and again, such as a normal exam, when you type or say its trigger after a dot (.normexam). They work in dictation and in notes. In Dot phrases, click New and enter a Title, a one-word Trigger and the Text.
Custom keywords
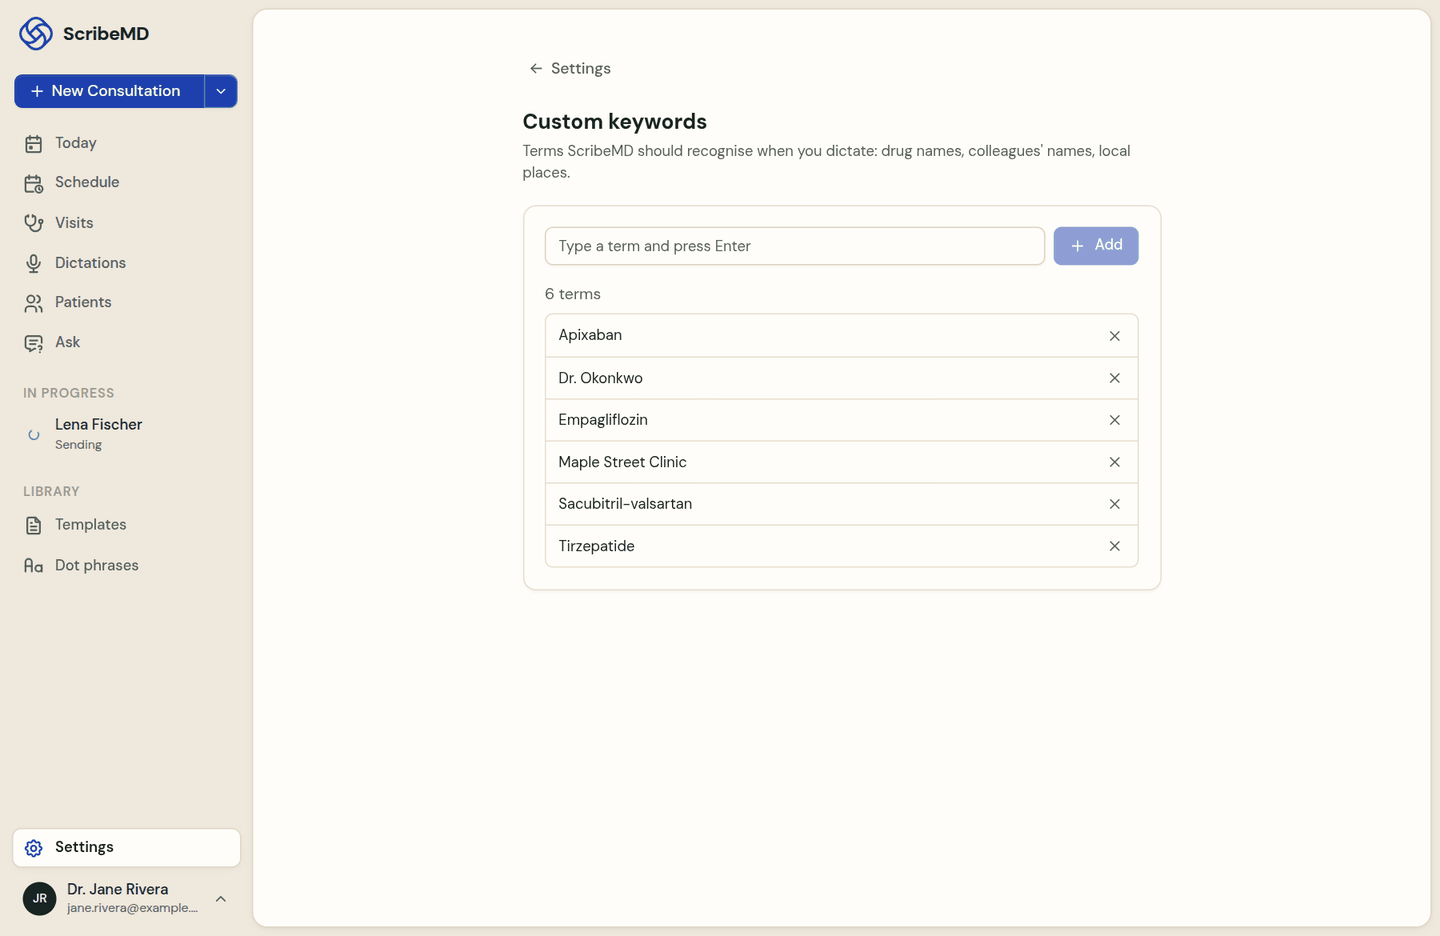
Custom keywords help ScribeMD recognise drug names, colleagues and places. Add them in Settings › Dictation › Custom keywords.
Settings
Settings, at the bottom of the sidebar, holds what applies to this computer.
| Section | What it does |
|---|---|
| Account | Who you are signed in as, Switch account and Sign out. |
| Dictation | The dictation shortcut (hold it, or double-tap it for hands-free), the microphone, the default template and language, sounds, Polish with AI, showing words while you dictate, and custom keywords. |
| Ask ScribeMD | The shortcut that opens the Ask panel from any app. |
| General | The app's language, the theme, Open at login, and whether ScribeMD shows in the Dock or only in the menu bar. |
| Permissions | Which macOS permissions are on, with a button to fix each one. |
| Devices | A Philips SpeechMike, what each of its buttons does, and a button test. |
| Updates, About | The update channel, Check for updates, and the app's version. |
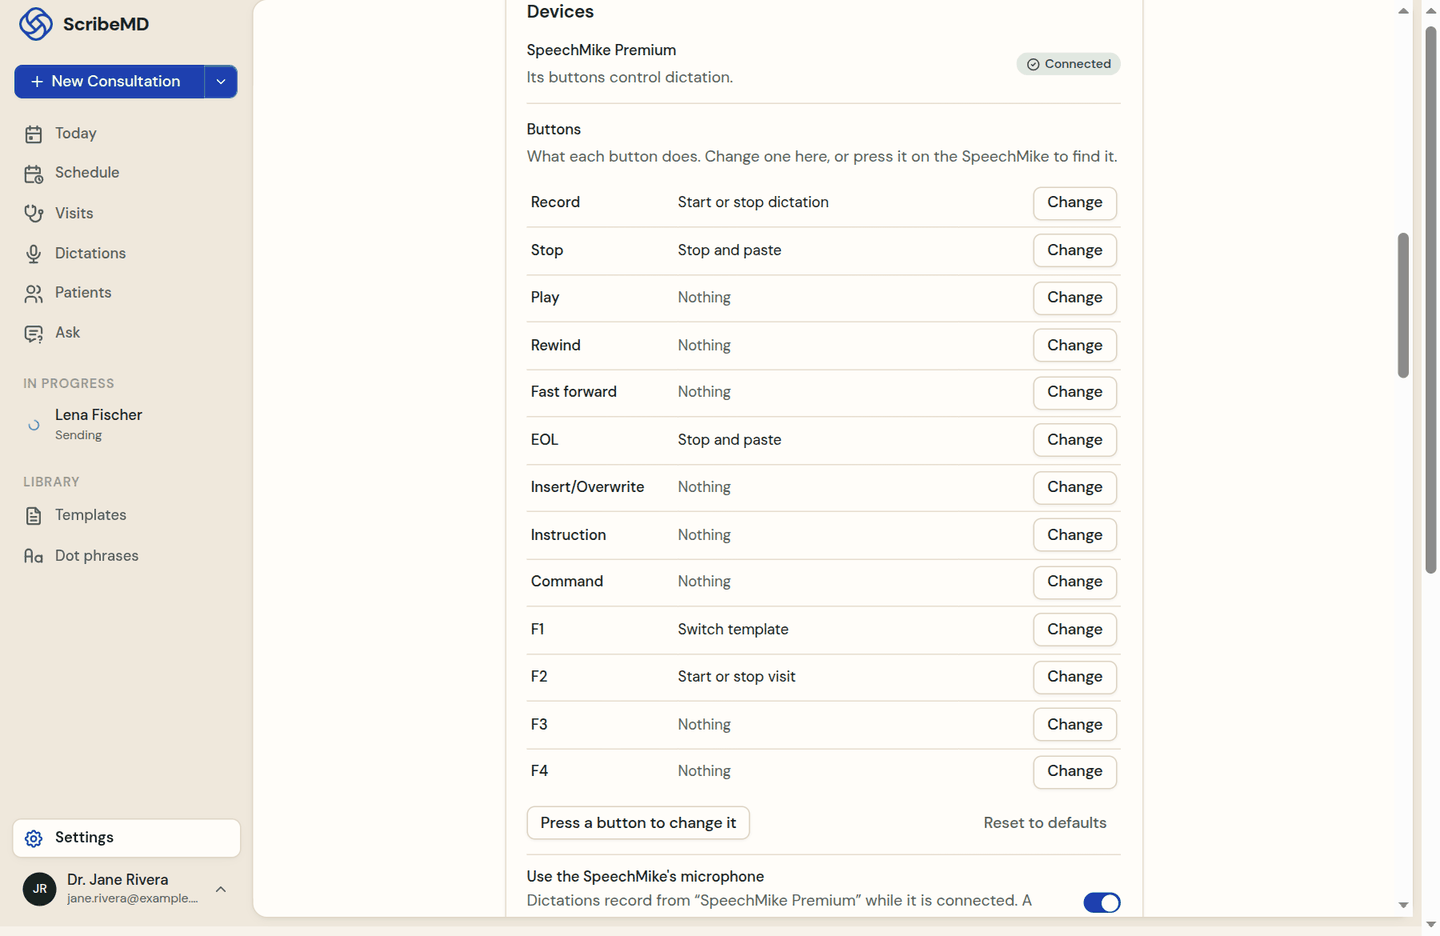
Philips SpeechMike
Plug in a SpeechMike: ScribeMD finds it without any Philips software. By default Record starts and stops dictation, Stop and EOL stop and paste, F1 switches template and F2 starts or stops a visit. To change a button, click Change next to it in Settings › Devices, or press the button to find it.
Updates. ScribeMD looks for updates at launch and once a day. When one is ready, choose when to restart: it never restarts while you dictate or record.
Setup guide. To go through permissions, shortcuts and a practice dictation again: Settings › Help › Setup guide.
Troubleshooting
What the app's messages mean, and what to do about them.
The text was not pasted
The bar shows Not pasted when there was no text box at your cursor, or when Accessibility is off. Click Copy and paste it yourself, then check Settings › Permissions.
The dictation key does nothing in other apps
Turn on Input Monitoring for ScribeMD in System Settings › Privacy & Security, then quit and reopen ScribeMD. If another app uses the same key, choose another one in Settings › Dictation.
No microphone found
Connect a microphone, or choose the one you use in Settings › Dictation › Microphone. If Microphone access is off, turn on ScribeMD in System Settings › Privacy & Security › Microphone.
The other side of the call is not recorded
The recorder shows Can't hear the other side yet. Click Test system audio, or allow System Audio Recording for ScribeMD in System Settings, then quit and reopen ScribeMD.
You are offline
Dictations and visits keep recording: the audio is kept, encrypted, on this computer and sent when you are back online. Notes, Ask and the schedule need a connection.
The note was not written
If a visit shows Couldn't write the note, open it and click Retry.
Something is only on the web
A few actions, such as creating a template with AI, organising sections or uploading audio, are not in the desktop app yet. Where that is the case the app offers a link that opens the page in the web app.